

Getting started with My Financial Life
From a fresh install to your first imported statement, budget and portfolio — about ten minutes. Everything stays on your own machine the whole way through.
1. Install it
My Financial Life 1.0.0 is free software for 64-bit Linux. Grab whichever format suits your system from the download page — there is no account to create and no licence key to enter.
- Debian / Ubuntu:
sudo apt install ./my-financial-life_1.0.0_amd64.deb— it then appears in your applications menu. - AppImage:
chmod +xit and double-click. One portable file, no install, no root. - Tarball: extract and run
./my-financial-life. Any distro../install.shadds a menu entry under~/.localwithout root.
You don’t need Python, a virtualenv, or a terminal beyond that first command — Python and Qt are inside the package. The download page also publishes SHA-256 checksums, which is worth two seconds on a finance app.
2. First launch
The welcome dialog asks two questions — your base currency and the name of your first account — and then you’re in.
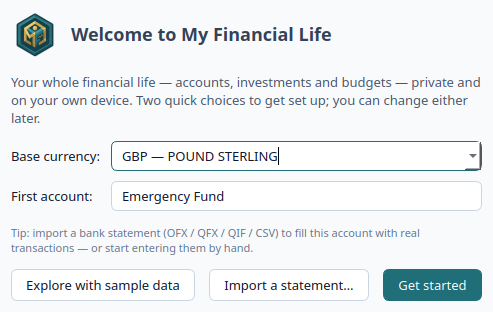
Your base currency is the one your net worth and reports are totalled in. You can still hold accounts and investments in any other currency; they’re converted to your base for the big-picture views.
If you’d rather look around before typing anything of your own, open the sample data — a complete fictional household with years of transactions, a portfolio, a mortgage and budgets, so every screen has something real in it.
3. Where your data lives
Everything you enter goes into a single .mfl file — plain SQLite — kept in
~/Documents/My Financial Life/. It saves as you work and keeps rotating
snapshots, so you can roll back a bad afternoon.
That file is yours. Installing, upgrading or removing the app never touches it; back it up like any other important document. There is no cloud copy, because there is no cloud.
4. Import your first statement
Add an account — current, savings, credit or cash — then bring in transactions from the files your bank already gives you: OFX, QFX, QIF or CSV. For an unfamiliar CSV layout, the column-mapping wizard lets you say which columns are the date, amount and description.
Categorise a payee once and the app remembers, applying it on the next import; a rules engine handles anything more involved. Re-importing an overlapping period is safe — duplicates are detected rather than stacked up.
Automatic bank downloads are in progress and aren’t in 1.0.0. Import is manual for now.
5. Set up a budget
Open Budget to assign what you have. It’s an envelope/zero-sum hybrid: allocate per category per month, and roll over what you don’t spend. The annual matrix shows the whole year in one grid — planned, actual, and the difference — while the monthly view burns down against plan, so you know on the 12th whether you’ll make it.
Savings and pay-down goals sit alongside, and bills can be tied to scheduled transactions.
6. Add investments
Create an investment account and add holdings — shares, funds, bonds or options. Enter your cost basis, or import the buys and sells, and the app tracks true FIFO cost basis, realised and unrealised gains, dividends, splits and merges, and returns as a money-weighted IRR.
Prices can come from Tiingo using your own API key, or you can enter them by hand. The key is yours and the request carries nothing about your accounts or transactions — and the app works fine without it.
7. Go multi-currency
Hold accounts and securities in any currency. Historical exchange rates mean last year’s numbers stay correct rather than being re-stated at today’s rate, and you can convert any report into whichever currency you think in. Rates are the second optional network call, again with your own key.
8. Where to next
Explore the reports — the cash-flow Sankey and Net Worth views are a good place to start, and every figure drills through to the transactions behind it. If you keep a loan or mortgage in the app, the amortisation schedule is worth a look too.
My Financial Life is free software under the GNU General Public License v3. The complete source is on GitHub, and so is the changelog.
Questions the docs don’t answer? We’re happy to help — or open an issue.